Technical Support - The Molecular Symmetry Painter
The Molecular Symmetry Painter is a Java based application that allows interactive drawing of symmetry elements on molecular models in three-dimensions. The painter uses Jmol for molecular visualization, and was built as an open tool such that any molecule can be uploaded, and any element can be drawn. The painter may be used for teaching and practice of basic concepts of molecular symmetry. It can also be used to prepare high quality images and presentations.
- System requirements
- The Molecular Symmetry Painter Screen
- Working with the Molecular Symmetry Painter
System requirements for using the Molecular Symmetry Painter
1. Browser: Internet Explorer version 7.0 or above
2. Java JRE 5.0: Needed to view molecules in three-dimensions. To download and install update 5 of the J2SE Runtime Environment 5.0, click here.
Upon entering the Molecular Symmetry Painter, the following message may appear:
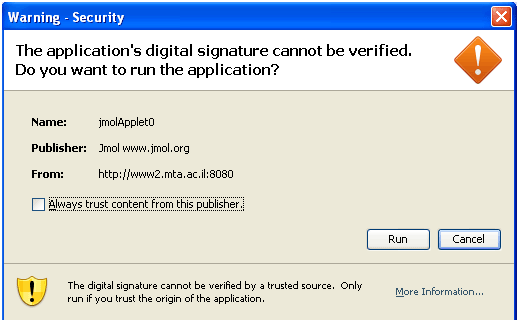
Click Run to allow uploading molecules from the user's personal computer. Click Cancel to disable this option, and work solely with the built-in molecular database.
The Molecular Symmetry Painter Screen
The Molecular Symmetry Painter screen is divided into several areas:
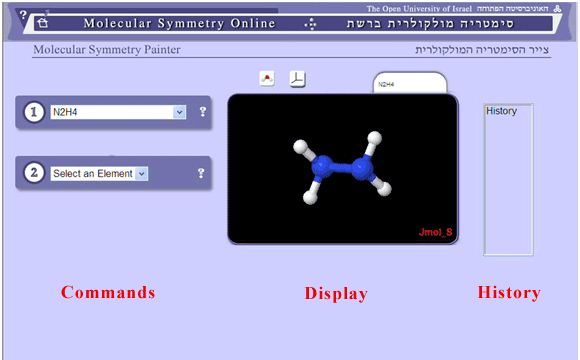
- The Commands area is located on the left of the screen and contains menus for selecting a molecule and elements to draw.
- The Display area is in the center of the screen. It contains a Jmol window in which the molecule is displayed. The name of the molecule appears in a tag above the window. Clicking the right mouse button inside the Jmol window opens the Jmol menu. For help with this menu, go to the Jmol help page by clicking the question mark at the top left of the screen. Above the Jmol window, there are two display buttons:
 Click this button to display the Cartesian coordinate system. Click again to hide it.
 Click this button to toggle between the ball and stick display and the wireframe display.
- The History window is on the right side of the screen and allows for displaying or hiding elements created by the user.
Working with the Molecular Symmetry Painter
Please note: The question mark icon at each step displays a short explanation of the step upon rollover with the mouse.
Step 1: Selecting a molecule
Click on the arrow to see the list of molecules available on the Painter database. The molecules are arranged in alphabetical order of their chemical formula. Select the molecule to be displayed in the Jmol window.
Comment: To upload a molecule from the user's personal computer, choose browse at the end of the list. A browsing window will open from which one can navigate to the specific directory and choose a file. Molecules can be displayed in various chemical formats. For an updated list of molecular file formats, see http://jmol.sourceforge.net.
Step 2: Selecting an element

Select the element that you wish to draw:
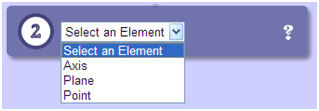
Select Axis to create an axis, Plane to create a plane and Point to create a point.
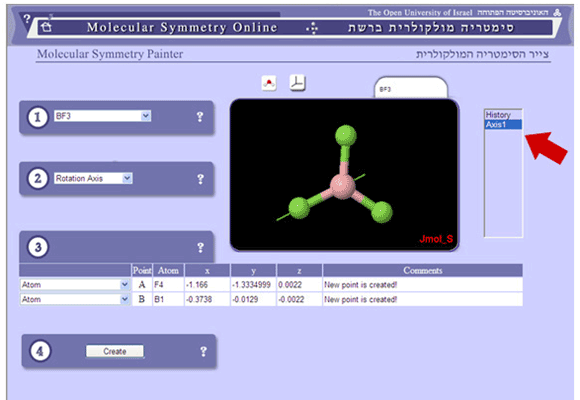
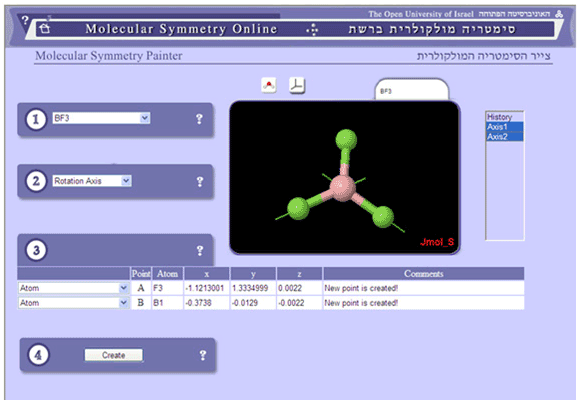
A coordinate table will open for the selected element. For an axis, the table includes two lines (see image below), for a plane three lines and for a point one line.

Step 3: Entering the coordinates
Drawing a symmetry element requires definition of points on that element. One point is needed to define an inversion point and two for a rotation axis. For a mirror plane, three points, which are not on the same line, are needed. In order to choose the coordinates, follow these steps:
- Look at the molecule and try to decide through which points the symmetry element goes. On complex organic molecules, the hydrogen atoms can be hidden for a better view of the molecular skeleton. Click the right mouse button in the Jmol window and navigate through the menu:
Style → Atoms → Show Hydrogens - Choose this option again to show the hydrogen atoms.
- Click this icon
 above the Jmol window to display the molecule in wireframe format with the atoms' serial numbers.
 - Click this icon
 above the Jmol window to display the Cartesian coordinate system.
 - Select the points through which the element goes. Note that each point may be one of three options:
- An atom in the molecule (e.g., C1, H2, O3)
- A mid-point between two atoms (e.g., between C2 and H5)
- Any other point in space
Each point in the table represents a point in space. In the left cell of each line, select the type of point (atom, mid-point between atoms or enter coordinates manually).

Fill in the rest of the cells in the line:
- Atom - With the left mouse button, click on the chosen atom in the Jmol window. The type of atom and its coordinates will appear in the table. For example:

- Mid-Point Between Atoms - With the left mouse button, click on two atoms in the Jmol window. The names of the atoms and the coordinates of the point appear in the table. For example:

- Enter Coordinates Manually - enter the x, y and z values of the point in the relevant cells. The Cartesian coordinate system (explained above) can help in choosing the correct values.
Step 4: Presenting the symmetry element
Once the table is complete, click the create button to display the element on the molecule.
Note that after clicking the create button, the name of the element appears in the history window. For example:
Step 5: Navigation between elements
The Molecular Symmetry Painter allows creation of many symmetry elements and navigation between them through the history window. Display of all elements created by the user is the default setup. Choosing a different molecule deletes the history list. To view a specific symmetry element, click its name in the history window. Use the shift key to choose multiple elements. To hide all symmetry elements, click the word History.
Please note: for each molecule displayed in the Jmol window, any number of axes and planes can be drawn, but only one inversion point.
Step 6: Test
Using specific Jmol commands, users can display the actual symmetry elements, and compare them with their own elements. If the actual elements and the user's elements are congruent, the user's elements are correct.
From the Jmol menu, click Console to open a command line window. In the lower part of the window, enter one of the following commands:
| Command | Result |
| calculate POINTGROUP | The name of the symmetry group appears in the upper part of the Console window. |
| draw POINTGROUP X where X is one of the following: Cn, C2, C3, C4, C5, C6, C8, Sn, S3, S4, S5, S6, S8, S10, S12, Cs, Ci |
All symmetry elements of a certain type are displayed. For example, draw POINTGROUP C2 causes all possible C2 axes to be displayed; draw POINTGROUP C3 2 draws the second C3 axis only. |
| draw POINTGROUP | All symmetry elements of the molecule are displayed. |
| draw DELETE | All elements are deleted, including user-created elements. |
